Wednesday, February 16, 2011

Groceries are Cheap Again!

We have been working really hard to cut down on expenses. We have cut down on eating out a ton lately which is good because that is expensive! But then our grocery bills would just tick me off every time I went, even if it was just to grab a few things. I looked into couponing but that seems like way more work than I am willing to take on. So I took some advice from friends and am trying out a couple of new things that are working out great.
Image from here.
First, I am doing a weekly menu. This way I can be sure to cook things that get rid of the food we already have (my pantry is FULL and needs to be clutter-free when we put the house on the market) and just buy what I need that week when I go to the store. Plus we always know what's for dinner and have plenty of leftovers in the refrigerator to take for lunch. [Side-note: Unfortunately, I have been getting busier at work so I only end up making about half of what's on the menu but we still have plenty to eat.]


The other thing that I can't believe I didn't try sooner is to shop at Aldi. It is incredible how cheap it is there, and their food is of very good quality. The only thing I've thrown out was their knock-off Cheez-its. Apparently nothing's like the real thing. I have yet to spend more than $70 on a trip... which it WAY cheaper than the grocery store I was going to (my average for a normal trip was probably $120 and around $25 for just running in for some things). And we aren't exactly holding out on buying things either - the last time I went, B came along and we ended up getting candy and ice cream.

The reason it took me so long to try Aldi even after on of our friends had been recommending it a long time is that I was afraid of change. I knew they had some different ways of doing things like not providing bags and not taking credit cards and having to pay to use a card. Those things freaked me out a little so I was nervous going the first time with a baby in tow. Here's the lowdown in case you're scared too:
  1. Carts are outside the store. You need a quarter for a deposit to "rent" the cart. You just stick it in the deal on the handle and it releases your cart. You get your groceries, unload them, and then walk the cart back to the building to plug in your cart and get your quarter back. (This is supposed to save labor costs of people having to go around  the parking lot and bring the carts back to the building, therefore making your groceries cheaper.)
  2. You have to either pay with cash or a debit card using your PIN. No credit cards allowed. (Credit card companies charge fees to merchants - a fixed fee each time a card is swiped plus a small portion of the sale. My dad as a grocery store owner himself hates this.)
  3. There are no free bags for your groceries and you bag them yourself. If you forget your bag or need one, they have reusable or paper bags that you can purchase for a small amount. You will unload your groceries and the cashier will scan them and put them into another cart. Then you swap carts and walk over to the window where there is a counter for you to bag your groceries. I for one like this because I can group my cold stuff together and fill the bags to my liking.
Image from here
So if you're looking to cut out some expenses I would highly recommend doing at least one of these things. I think you will notice significantly lower grocery bills.

Sunday, February 13, 2011

Robert Sabuda Books

Wow! I came across these pop-up books out there in blog world and just had to share. I remember really loving pop-up books as a kid and these ones are incredibly intricate. Here are some pictures I found around the internet of the Alice in Wonderland book...


And here is a video showing the Peter Pan book.


I am definitely going to start a collection of these and little Ky-man is going to have to keep his hands off of them until he is old enough to handle them carefully!

Tuesday, January 25, 2011

Ski Trip

We just got back from a four night stay in the high country in Colorado. We went on a ski trip with a couple of friends and stayed at a condo in Breckenridge. We skied Breck the first day, then Keystone, and Vail the last day. As much as I hate to say it, I had a really good time. The second time skiing was much better than my first. (To make a long story short I got frustrated when my ski instructor took me down a pretty steep run that I had a lot of trouble with and I ended up throwing my skis at him... Brett was my ski instructor.)

We tried to leave Wednesday night and get as far as my parents' house to drop off the kid and dogs but the heavy snowfall prevented us from going more than a couple of miles from home. So we left around 5:30 Thursday morning. We took Highway 36 all the way through Kansas and stopped at one landmark on the way... the geographic center of the 48 states. It was somewhat underwhelming as you may have guessed.


The first day skiing at Breck went okay. I had a couple of minor falls but overall it was a good day. We stayed on mostly green runs (the easiest) and ended up doing a lot of walking or pushing ourselves with our skis. It was pretty cold and windy and even snowed in the morning. The next day we went to Keystone. The weather was about the same but it was even more windy, especially at the peak. Sometimes the wind would push me back or stop me from moving forward when it wasn't very steep. I had a pretty good wipeout that day at the end of a run but I was mostly skiing blues. Surprisingly enough, my favorite run was called Paymaster. The name was definitely intimidating though. Toward the end of the day Brett and I decided to take a ride to the other mountain on the Outback Gondola. It was pretty fun. We planned to ski down one last time but my goggles had fogged up on the gondola and then the condensation froze, so we ended up just riding back down.


The third and final day of skiing we decided to drive over to Vail. Believe it or not, there was even more snow on the way there. We saw a sign for "Avalanche Area" along the road. The trees were full of snow and there were huge piles of snow along the side of the interstate. The roads were all snow packed once we got out of Denver and higher into the mountains.


I had never been to Vail before that I can remember. It was really nice and as fancy as I imagined. The architecture and decoration of the shopping area around the base of the mountain is pretty neat and most of the sidewalks in that area are heated. It was a beautiful day - nice and sunny, no wind, and no clouds. And Vail is so big that the slopes seemed empty compared to the other places so that was also nice. They were well groomed and there was quite a bit of powder in some of the less popular areas which Brett enjoyed. Our friends did one run with us - a pretty steep green - and then decided to call it a day since they had already done two full days of skiing. I went on with Brett and we did several blue runs and hit the terrain park a couple of times (I just videotaped - and got a pretty good wipeout on camera when Brett didn't quite land his jump). We were amazed at the view when we rode the gondola up the first time.


I think taking in the scenery is probably my favorite part about skiing (other than making my husband happy). The view on the way back down was almost as nice. I'm happy to say that I did not fall one time on the third day although I am a a pretty cautious skier with really bad form (the 4-year-olds make me look ridiculous).


We had a pretty economical trip overall. Our condo, rentals, and lift tickets were a package deal that ended up costing around $500 per person. We bought a bunch of food from the grocery store for breakfast and to pack sandwiches for lunch (which ended up being a little smashed by the time we ate them after being in Brett's backpack all morning). We ate out at a place called Mi Casa the first night, ate frozen pizzas and hit the hot tubs the second night, had lunch at a bar in Vail, and dinner at Rasta Pasta the last night. Since we didn't eat our sandwiches for lunch we decided to have them on the way home. They weren't all that great and we were one short so our clever friend made lettuce wraps out of what was left in the refrigerator. We were feeling pretty cheap and not at all wasteful.

We made really good time getting back home. We left Breck around 6:30 in the morning, got stopped shortly thereafter while some avalanche work was going on for about 45 minutes, lost an hour due to the time zones, had to stop to pick up the baby and dogs, dropped off our friends, and still made it home before 9:00. I think it was eating our leftovers that saved some time but we had Freddy's pizza in Seneca to make up for it - Brett even tried my favorite (hamburger, sausage, and sauerkraut). Or maybe it was the fact that we only had to pass 3 cars in about 6 hours after leaving Denver. We passed the time on our desolate drive by playing our own version of "Don't Forget the Lyrics" by playing songs we knew and pausing to see how long we could continue singing. I'm surprised we still had our voices the next day. Overall, it was a great trip and a lot of fun. Now we have to decide if we want to move to Seneca or Colorado when we sell our house!

Wednesday, December 1, 2010

Great Gift for Small Children

I found the most awesome gift for small children (ages 6-36 months according to the packaging). I have a pretty good feeling that Santa will be bringing this for Kyler. ;)


It is under $20 and it is a toy from Leapfrog called My Pal Scout (the girl version is Violet). It comes with a USB cable that plugs into the computer so that you can personalize it. And the greatest thing is that "Kyler" was already in the database if you can believe that. It is really soft and cute and has a cute and not too annoying voice. Oh, and you can turn down the volume which is a great feature for parents. Check out the demo here by entering your or your child's (or Kyler's) name:

http://www.leapfrog.com/toys/scoutad.html

Sunday, November 28, 2010

Joining the Advent Conspiracy

I love the holidays. The only good thing about the cold weather is how warm and cozy our home and our families' homes feel during the Thanksgiving and Christmas gatherings. They are filled with delicious food and lots of family. Usually everyone is happy and enjoying the company of one another. There are games and lots of laughs and Christmas cheer.

I couldn't care less about the gifts. One of my favorite things is doing a white elephant gift exchange where you find something in your house that you don't want anymore and wrap it up for a gift exchange. It is so much fun to see what everyone opens up and hear the stories on where these [usually crappy] items came from. Plus you get rid of something you didn't need cluttering up your house. And most of all you don't go out and buy something that the recipient may or may not like.


This video reminded me that I need to go back through my list of recipients and the gifts I had in mind. I am not going to buy things I think they might like. Instead I am going to get creative and crafty and come up with a more homemade gift that still shows that I am thinking of them.

Monday, November 15, 2010

Pollo Magnifico - My Version

I almost forgot to post this - the best Mexican food I've ever made. It is sinful. I was just trying to get rid of some leftover ingredients (shredded chicken and cream cheese) and one of Jose Pepper's menu items came to mind... "Pollo Magnifico." Here's what I did.

Jose Peppers Pollo Magnifico
1. Found 3 tortillas in the pantry. (They were wheat tortillas if that makes it any better.)
2. Grabbed 1 cup or so of my shredded chicken/bell pepper/cream cheese mixture left over from the empanadas.
3. Mixed together the remaining 1/2 package of cream cheese with a few heaping tablespoons of sour cream.
4. Plopped approximately 1/3 cup of shredded chicken, 1-2 tablespoons of cream mixture, and 1-2 tablespoons of salsa on each tortilla. Mushed the mixtures together and folded each tortilla. Squeezed them into a baking dish.
4. Covered with a generous amount of cream mixture. (I would estimate around 2/3 cup, maybe a little more.) Then covered that with a generous amount of shredded cheddar cheese - maybe 3/4 cup or so.
5. Covered with foil and baked at 350 degrees for 30 minutes. Uncovered and baked about 5 minutes longer for the cheese to really melt. (Jose Peppers deep fries theirs so mine was marginally better for you.)
6. Enjoyed thoroughly and talked with husband about how yummy it was. Dared eachother to eat the third one but neither of us could get ourselves to indulge. (We also bought ice cream, Reese's, and some Reese's hard shell topping so we were already feeling pretty indulgent by this point.)

Handmade Baked Chicken Empanadas

I made some handmade empanadas this weekend and they turned out to be pretty good. Mine were baked so they weren't quite as good as the fried ones but at least a little healthier. I cooked my chicken the night before and whipped these up in no time the next day.


Dough:
3 cups flour
a little salt (around 1/2 teaspoon)
1 1/2 sticks butter, cut up and colder than room temp
1 egg
4-5 tablespoons water

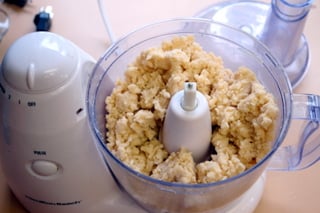
Use a food processor or something similar to mix together the flour/salt mixture and butter. It will be clumpy but that's what you want. Then add in the remaining ingredients for what will still be a slightly clumpy dough. Stick in the refrigerator for 20 minutes or so before rolling out into a thin crust and cutting 3-4 inch circles (I used a sour cream container).


Filling:
2 chicken breasts
thyme, paprika, salt, and pepper
1/2 package cream cheese
finely chop a little onion, yellow bell pepper, and red bell pepper

Put the chicken breasts in a pot with water just covering them. Add some thyme, paprika, salt, and pepper for seasoning. Simmer for around 20 minutes or until the chicken is cooked through. Shred the chicken with a fork. Mix in the cream cheese and chopped vegetables.

Put a little filling inside each circle of dough (use as much as possible while allowing yourself enough room to seal the outside). I think next time I will also add a pinch of shredded cheddar cheese in each empanada. Fold the dough in half and lightly pinch it closed. Use fork prongs to create the decorative edge of the empanada. Brush the top with egg white. Bake at 400 degrees for around 20 minutes.


You can also use this dough recipe to make fruit filled empanadas which I think I am going to do for the holidays. Sprinkle the top with a little sugar and cinnamon for a pie-like taste.

NOTE: These are not my pictures. I am not organized enough and do not have a tidy enough kitchen to take pictures as I am cooking so I found these on the internet and borrowed them.

Wednesday, November 10, 2010

Being Thrifty

Some might call it being cheap, but I like to think of it as being thrifty or smart. I hate spending money on things that are what I perceive to be a rip-off. Here are a couple of examples of how I have saved some of our hard-earned money.
Making my own baby food. This is super easy and everyone should at least give it a try. It hardly takes any time at all and you don't have to be a good cook to do it. Store bought baby food costs around 60 cents per jar. I can make approximately 20 jars by buying 5 apples or pears or a bag of frozen peas or a squash. Plus I know what has gone into my baby's mouth - no preservatives, food coloring, or anything else. Just the fruit or veggie and some water. I either microwave or steam the food and then puree it in our knock-off Magic Bullet with a little water. Then I use these trays from Fresh Baby to freeze the baby food in cubes and put them in freezer bags. Each meal I take a few cubes out and zap them in the microwave for a minute.
You probably also know that I use cloth diapers. Vegas Baby is almost 6 months old and we have bought a total of four packs of disposable diapers. Those are only used when he goes to daycare because they won't use cloth diapers there. It is really easy and not a lot of extra work since you don't have to hang or fold the diapers when they come out of the dryer.
I am also somewhat careful of the baby stuff that I purchase. There is so much out there that you really don't need so a lot of the time we would wait until we knew it would be something we would use before we made the purchase. For example, we didn't buy a swing until we knew Vegas Baby liked to be swung around. And we used hand-me-down toys, jumper, and walker. One thing that I could not get myself to buy was a Boppy pillow. Those things are $40 for the pillow and cover. I found one at Hobby Lobby for $15 and I used a 40% off coupon from the internet. Then for the cover I bought a handmade one from a stay-at-home mom on Etsy for around $12 which included shipping (about the same price as the ones in the store). It was a savings of almost $20, plus I was able to buy the cover from a person rather than a corporation. And it is really cute!

Wednesday, November 3, 2010

Carrot Cake Cheesecake

I decided to try to make carrot cake cheesecake tonight. Carrot cake and cheesecake are B's two favorite desserts and he tried this from the Cheesecake Factory once and loved it. I found some copycat recipes for that one online but because of my habitual disregard for recipes, I combined a couple of recipes to come up with my own. I have written out my "recipe" below, except that I also have a habitual disregard for exact measurements so some of them are just estimates. I'll update on whether it was any good once we taste test so don't try this at home quite yet.

NOTE: This is not what my cheesecake looked like. This is an example of what I was hoping to create that I found on the internet. Mine never turn out that pretty but the goal is them to taste good.

Crust:
1 cup graham cracker crumbs
3 tablespoons sugar
1/2 teaspoon ground cinnamon
3 tablespoons butter


Mix together and press into the bottom of a springform pan. Bake at 325 degrees for 10 minutes. 

Cheesecake Filling:
18-ish ounces cream cheese, softened
1/2 cup sugar
1/4 cup flour
4 eggs
1/4 cup orange juice


Beat cream cheese, sugar and flour at medium speed until well blended. Add eggs, 1 at a time, mixing well after each addition. Blend in juice.


Carrot Cake Filling:
3/4 cup vegetable oil
1 cup sugar
2 eggs
1 1/2-ish teaspoon vanilla extract
1 3/4-ish cup flour
1 teaspoon baking soda
1 1/2 teaspoon ground cinnamon

9-ish ounces canned pineapple, lightly pureed in a food processor (left some soft chunks)
3/4 cup steamed and pureed carrots


Mix 1st 4 ingredients, then add dry ingredients, then pineapple and carrots.


Cover the graham cracker crust with carrot cake. Spoon a layer of cheesecake over top. Then spoon a layer of carrot cake on top of that. Cover with cheesecake the best you can. Note that this recipe makes more than what you will need for a 9" springform pan. I also made a smaller cheesecake in a loaf pan by making another small batch of crust and using the leftover filling. Bake for 15 minutes at 450 degrees, then 45 minutes at 250 degrees. Turn off the oven and let cheesecake cool for an hour. Remove from oven and let set until completely cooled. Then refrigerate.

Topping:
4 ounces cream cheese
1 tablespoon orange juice
1 cup powdered sugar, sifted

Beat cream cheese and juice until well blended. Gradually add powdered sugar, mixing until well blended. Spread over top of cheesecake.


Update: This recipe tasted great. I think I can do better though. I have better cheesecake and cream cheese icing recipes that I will use. And I am going to be experimenting with carrot cake to find a recipe that I really like. This one tasted good but it had more of a consistency of pumpkin pie filling than carrot cake because of the pureed carrots. I have a pretty decent recipe but it has actual shredded carrots and coconut and I don't like the texture of those things in my cake.

Tuesday, November 2, 2010

More Fun Halloween Treats

I know Halloween has passed but I had to make note of this super cute idea I came across. I found the picture here and the recipe here.


Halloween Smores In A Jar 
Ingredients:
1 quart mason jar
1 sleeve graham crackers
1 package holiday marshmallow peeps
one bag of holiday M&Ms candies
1/3 cup of brown sugar
Directions:
1. Crush 1 sleeve graham crackers to crumbs.
2. Layer 2/3 of the graham cracker crumbs in a 1 qt jar. Pack down the crumbs a bit.
3. Arrange 8 to 12 marshmallow holiday peeps standing up, facing out around the inside of the jar. Press them up against the glass.
4. Carefully spoon remaining cracker crumbs in the center of the jar to support the peeps, pressing down to keep it snug.
5. On top of this pour 1-1/4 cup M&M's in holiday colors.
7. Spoon 1/3 cup brown sugar into center of M&M's, gently pressing with a spoon. If you have any room left over, fill the jar to the top with M&Ms.
Cooking directions:
1. Empty the jar contents into a bowl.
Snip the peeps into bits with kitchen shears or cut up with a knife.
Return the peep bits to the mixture. Mix well.
2. Melt 1/2 cup butter; add 1 teaspoon vanilla. Pour this over the dry ingredients, mixing well. Pat into a greased 8" or 9" square pan. Bake at 350 degrees F for 15 minutes. Cool and cut into bars.
What a creative and special gift for a teacher, neighbor, or friend!   I love how she personalized it with the cute label and holiday towels.  This can be done pretty inexpensively, too, since you can usually find those hand towels at TJ Maxx, Ross, or Marshall’s for under $5.00.


Update: I made the Christmas version of these using red and green M&Ms and holiday Peeps (snowmen, gingerbread men, and Christmas trees). I went to the craft store and bought a tiny strip of green Christmas tree fabric to stick under the lid with the edges of the squares sticking and some red and white striped ribbon to wrap around the lid tied in a knot. I printed off the cooking directions in red text and glued them to a piece of green cardstock. Then I cut a little hole in the cardstock and attached the cooking directions onto the ribbon. They turned out really cute and word on the street is that they were pretty tasty - although who would tell me that they weren't?